786/110


The heart knows well what words can't say...the hopes and dreams of every day...Hi all....
i am back with one of my most favourite and close to heart projects that i made for the final submission for Heartfelt Creations DT.
It holds a very special place in my heart...i put my heart and soul while creating it...its an Interactive Album with lots of
pages for photos,journalling tags,pockets,sleeves,magnetic flaps etc. to treasure the memories and mementos.
I remember my excitement,0n the beautiful day when i recieved my package from HC and on unwrapping the mystery,
this amazing collection of mesmerizing gorgeousness swept me off my feet....just by glancing at it
i could feel the soft breezy feel of the sea...
the vastness of the eternity of the ocean...the depth of the life in the sea...
the smiles of the weeds...the echoing silence of the shells...the sound of the waves..
the cheerfulness of swaying fish...the cuteness of tortoise...the splash of bubbles...the freshness of water...
the blooming beauty of hibiscus...i can just go on and on....!!! The awesomeness of the entire collection inspired me to create albums,cards,mixed media,boxes etc...
to feel the pleasure of this divinity just dive into its infinite world of awesomeness...let your creativity float in the loveliness of Under the Sea...i just did :)
'By the Sea' A Heartfelt Creations' FlipFold Interactive Album
Hello all my Crafty Friends. I am here to share and inspire you with the awesome range of Heartfelt Creations Products. The Flipfold Album with its Versatile Pockets and Flipfold Inserts gives you the freedom and scope to imagine and create without much worrying into the proper specifications of the measurements. This Sturdy and Neat Album Base along with the Super Beneficial Flipfolds and Pockets let you have the complete thrill of hasslefree crafting where you can give wings to your creative genius by adding on your own fabulous ideas to create a work of wonder.
Heartfelt Creation products Used :
3D Flip Fold Album HCFA1-430
Under the Sea Paper Collection
Coral Reef Collage Die HCD1-798
Coral Reef Collage Cling Stamps HCPC-3738
Tropical Hibiscus Die HCD1-796
Tropical Hibiscus Cling Stamps HCPC-3736
Pocket and Flipfold Inserts A-Black HCFP1-433-1
Pocket and Flipfold Inserts B-Black HCFP1-434-1
Pocket and Flipfold Inserts C-Black HCFP1-435-1
Pockets and Flipfold Inserts D-Black HCFP2-436-1
Ornate Borders and Pockets HCD1-780
Regal Borders and Pockets HCD1-779
Fleur Borders and Pockets HCD1-778
Decorative lattice Swirl HCD1-733
Border Essentials HCD1-783
Cut Mat Create 2A HCD2-751
Cut Mat Create 2B HCD2-752
Cut Mat Create 1A HCD 749
Cut Mat Create 1B HCD2- 750
Everyday Heroes HCD1-761
Deluxe Flower Shaping Kit HCST1-401
Classic Leaf Die HCD1-736
Classic Leaf Cling Stamps HCPC-3546
Luggage and Tags Dies HCD1-745
Bold Leaf Cling Stamps HCPC-3547
Tattered Collage Cling Stamps HCPC-3471
Other products Used :
Black,Green,Blue,Peach,White,Yellow Cardstock Cardstock
Spellbinders Circle Dies
Spellbinders Swirl Bliss Pocket
Spellbinders Bird Banner
Spellbinders M-Bossibilities EL-026
Spellbinders Mini Envelope
Versamark Watermark Stamp Pad
Ranger Princess Gold Embossing Powder
Ranger Enchanted Gold Embossing Powder
Ranger Distress Ink Worn Lipstick
Ranger Distress InkVintage Photo
Ranger Distress Ink Fired Brick
Ranger Distress Ink Peeled Paint
Ranger Distress Ink Evergreen Bough
Versacraft White Ink
Altenew Evergreen Crisp Ink
Metallic Gold Stamp Pad
Eberhard faber Granite Gold Paste
Eberhard Faber Granite Sand paste
Real Shells,Pebbles,Stones,Sand
White Glue
Prima Marketing Heavy Gel
Mod Podge
Glitter
Lindy's Stamp Gang's Sprays' Shades of Greens and Blues
Resin Embellishments
Twines
Double Sided Strong Red Tape
Black Ribbon
Jute Twine
Magnets
Golden Green Sparkly Glittered Washi Tapes
Ranger Glossy Accents
Faber Castell Glass Bead Glitter Gel
Laces
Bubble Stencils
Acrylic Thin Sticks
Fabric Glue
Metal Charms
Corner Protectors
Acetate Sheet
Pearl Strings
Ranger's Heat It Drier Tool
Die Cutting Machine
Instructions:
The Cover Page:
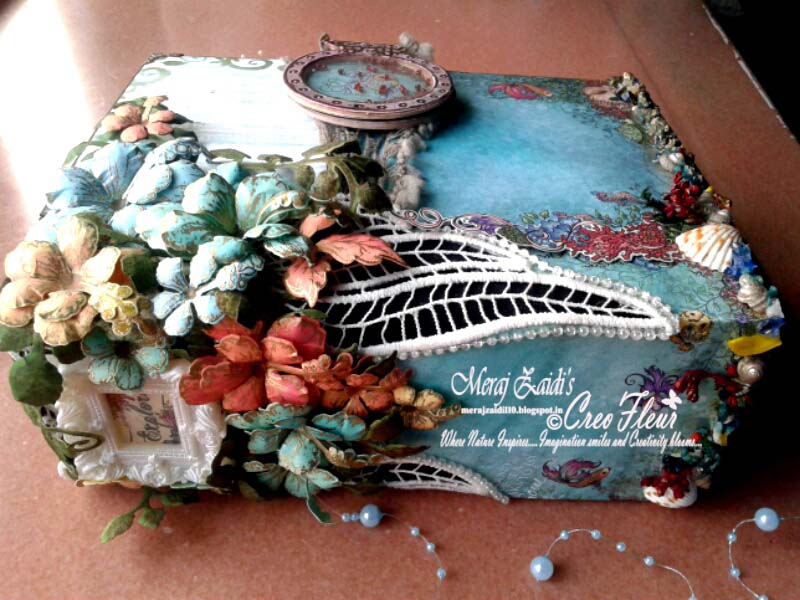
Since I wanted to show the complete Theme of the beautiful Under The Sea Collection ,I used two parts of papers on the front cover,showing both the beauty of Hibiscus Flowers and the Under the Sea Effect.
Leaving just about 2mm black blank space on the borders of the base I cut 1/4th of Hibiscus paper on top and 3/4 of marine scene down proportionally balancing with the base,leaving the Cloth bound on the Spine of the album. Diecut the Classic Leaf and use it as a stencil ,inking it up with green distress inks on the sides of the blue lined hibiscus paper.
On lower marine themed paper I used the granite gold texture paste to give depth and real feeling of the under the sea effect at its base. Used some real shells,stones,pebbles sand,beads,glitter,fish etc adhering them with Heavy Gesso and white glue. To give it a subtle glittered look,spray some blue green shades of Lindy's.
Glue both the papers on the front hardboard base with white glue or Mod Podge.
I adhered some delicate Acrylic Sticks on the floral paper aligning with the light blue vertical lines.
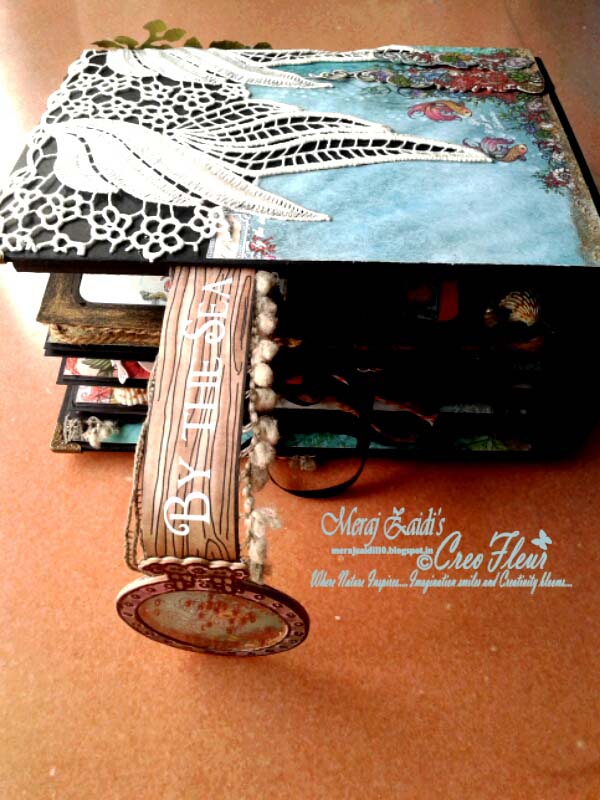
To cover the joint between two papres and enhance the aesthetic value I glued the Fish Net like Lace over it.
I adhered the delicate lace with falling leaves effect starting from the top left corner of the spine cloth,over the spine and the back cover of the album. Fabric glue works good for it.
To cover the rest of the area ,choose similar kind of marine themed paper at the lower base and back cover. Cut according to shape of the lace and adhere, so that the black base of the spine and back are seen through the lace. To cover the joints die cut the Coral Reef and adhere over the joints,this also gives a 3D effect.
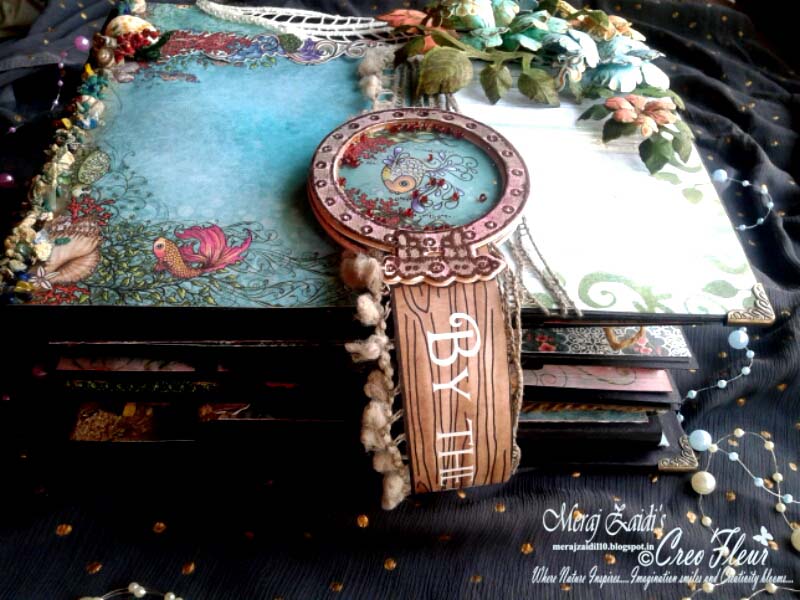
On the Top Centre of the Spine, I took a Resin frame,glued a text 'Explore'behind it and filled the front of it with Glossy Accent to give it a Glass like look once dried up. Adhere it on the Spine top centre.
On the hanging edge of the lace I adhered white pearl string to enhance the looks.
Arrange and adhere the flowers and leaves using their stamps and dies on the left top edge and over the spine.
To make flowers u need:
Tropical Hibiscus stamps and dies, green blue and peach papers. Stamp the flowers with Versamark ink, sprinkle Princess gold embossing powder and heat dry to melt and fix the powder giving a beautiful golden stamped image. Spray Lindy's colors as per desired.Die cut the flower image.Shape it up by using Deluxe Flower Shaping Kit. Stamp and die cut the leaves also.
To make the two magnetic Shake Shake flap handle closure I stamped and heat embossed 14 images using Coral Reef Collage Stamps and cut with co ordinating dies, 7 for each Shake Shake flap cover closure.
Cut two fish images from Under the Sea Collection according to outer shape of the Coral Reef round window. One for each.
Cut two Acetate sheets according to the shape of the round window.One for each.
Place the fish image first and keep layering and adhering the Coral Reef Window one over the other.On reaching 5th layer sprinkle some glitter and beads in the space formed as frame within the circle. Adhere the round cut Acetate sheet over it. And finally add one more layer of Coral Reef window . At the base of both the Coral windows adhere a small magnet and cover it with round circle paper to cover the magnet. This will form as a magnetic closure of the flap. Glue one coral
window on the right centre edge. For the other coral window, attach the lace overlapped by paper strip of text 'By The Sea' and attach it to the inside of back cover of the album.
To prepare the base of all 12 Pages of the Album, cut 12 pieces measuring 6 1/4" by 8 1/4" on black cardstock. Work over these cardstocks and finally paste it on the existing album page. This gives more neatness and sturdiness to the album.
Make lot of Tags and Notecards using the awesome collection from the paper itself using Luggage and Tags Dies
Here are some ideas on making Tags and Notecards
You can be as creative as u want using these gorgeous HC dies.
Take any size Cut Mat Create dies as per your wish. Using border,pockets dies, cut it on your preferred side. Adhere it on the same base of equal size from three sides to make provision to slide in the tags n notes. Decorate with paper strips,labels,embellishments etc. Let your creative juices flow :)
Page no. 1
Cut 'Under the Sea' paper , at the base give texturing with Gold Sand Paste,glitter. Adhere Fish Net like Lace on top edge. Die cut a big shell from Coral Reef Collage die and adhere on bottom right of the paper making it as a pocket for tags.
Page no. 2
Cut and adhere 'Under the Sea' paper over the precut cardstock mentioned above. At the base adhere real stones,shells,glitter etc with textured sand effect. On right edge,adhere black lace with sequins over it and join in the strip of Border Essentials die cut to form a sleeve for fotos and tags.
Cut two pieces of black cardstock using Cut Mat Create 2B die measuring 3.5/ 4.5. Cut a circle in centre with Spellbinder die. Emboss it with Spellbinder Embossing folders . Use metallic and pearly Shimmerz Inklingz to rub over the embossed area.Adhere stones and give sandy texture at the base. Cut one more Cut Mat Create 2B die and adhere it at the back of first one,applying glue only on the left ,top and bottom edge,leave the right edge unglued for foto to slide in. The foto frame is ready.
Using Spellbinder Pocket Swirl die,attach it folded on the back of frame and the top edge of the page for easy flip fold lifting.
Page no. 3
Cut 'Under the Sea' paper. Use Regal Border and Pockets die to form a flap on top with magnets at base and flap. This will provide provision for placing notes,fotos and tags without slipping down.
Page no. 4
Cut and Paste 'Under the Sea ' paper with a Sleeve Flap at the left edge ,on the right edge use Pocket and Flipfold Inserts B-Black 6.25/15.5 Panel. Cut and paste papers as per your choice.I have used magnets between two small folds and flaps to hold notes and pictures. Used Regal Borders and Pockets die and Spellbinder Pocket Swirl Bliss Pocket dies.
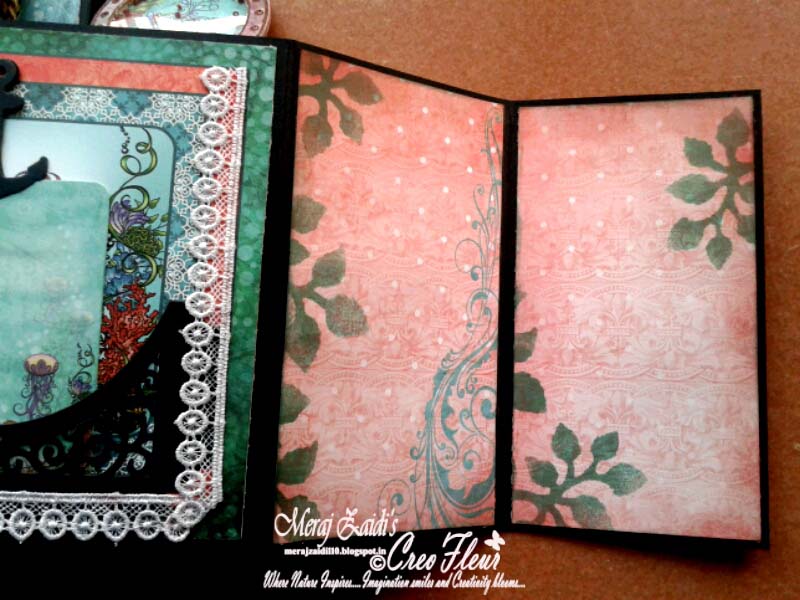
Laces are also used to enhance the visual appeal.
On some papers I have stenciled witht he Classic Leaf diecuts using Distress inks. This gives a more interesting and new look to the papers.
Page No.5
I chose and adhered a paper with a text over it. To give more depth and interesting feel I used and adhered the real shells and beads to already existing image of printed shells . I have used jute twines and thin delicate jute ropes to give a different look to this page.
At the base I have used Pocket and Flipfold Inserts A-Black measuring 8.25/5". I trimmed it a little from the right side to fit it to the page. Covered it with Under the Sea paper and stencilled it with die cuts using Distress Inks.
Page No.6
The foto frame flaps here are made in the same way as mentioned for page no. 2 above. The addition of Stencilling with Shimmerz Inklingz with the die cuts is there.Laces and jute strings are used with sleeve to hold tags and tickets at the base.
Page No. 7
Took a floral theme here with Hibiscus as main theme. Adhered a Bird Banner from Spellbinders.
Used Pocket and Flipfolds Inserts A-Black measuring 7.75/4.75. Paste paper over it and stencil it with diecuts using Distress Inks.This can hold lot of large fotos and memoirs.
Page No.8
I chose a beautiful large Hibiscus flower image to compliment this duo page theme.
Used Pocket and Flipfold Inserts D-Black measuring 10.75/24".
I have used Pearl string adhesives on every flap and fold,to give a different theme and look to the page with black ribbons. There is possibility of lots of sleeves and pockets to hold tags and fotos.
Page No. 9
Since every page has a different layout and theme in terms of material used and ofcourse the visual appeal,its mainly to break the monotony. So on this page I have used lots of Washi Tape Strips to give vertical and horizontal glittered broad panels.
On top 3/4th of the page I used the Under the Sea paper with a diecut in the top centre using Regal Borders and Pockets die.
On lower 1/4 of page I have cut the washi strips and adhered them giving 2 mm space for black paper to peep through it.
Fussycut a fish and glue it with a foam pad beneath it.
On the middleright edge of the paper I have used Pocket and Flipfold Inserts A-Black measuring 5"/9". On the back of this envelope I used Ornate Borders and Pocket Dies on an extra black sheet and adhered it to give a designed meshed arch look to it. Rubbed the Gold Sand Texture Paste over it.
Page No.10
Here I have used Pocket and Flipfold Inserts A-Black measuring 8"/2.75" over a pink Under the Sea paper. There is a flap of Regal Borders and Pocket Dies over which I used the Gold Sand Texture Paste. At the lower base I used Washi Tape strips again. Black ribbon is to give support to heavy tags and fotos kept in the Pocket.
Page No. 11
This is a very inetersting and one of my fav pages of this album :) I have used magnet at the left centre of the page edge.Adhered the Under the Sea page over it. Gave a textured effect at the base with real shells,beads,sand,glitter etc along with Gold Sand Paste.
On top I die cut the Fleur Borders and Pockets,textured it with Gold Sand Paste. Small tag or note could be inserted there.
Made a notecard with magnet behind it,so it could hold few more notecards or tags within it. Enhanced its look by adding a Hibiscus flower on its right lower edge. Adhered the jute rope around the left edge of the page.
To add one more interesting half page flap to it,i used Cut Mat Create die on a black cardstock measuring 5 1/2"/ 6 1/4" to form a window on it.Rubbed the Gold Sand Paste over it. I placed the beautiful doublesided Under the Sea paper beneath it. Die cut the Essential Borders and adhere it to be used as sleeve for tag or notecard inserts.Stick the jute rope below it to compliment with the adjacent page look.
When this flap is opened ,on the other side is seen the back of the double sided paper. I adhered a magnet and covered it with a leaf diecut. Fussycut a fish and adhere a magnet beneath it. This will hold strongly many tags and fotos. Using Spellbinders Swirl Bliss Pocket die a pretty pocket is created.
Page No.12
On the base of the paper create a textured look using real shells,stones,glitter,beads etc along with sand texture paste. On top adhere a die cut of Decorative Lattice Swirl textured with sand paste. This will hold small tags. Place and adhere a magnet beneath this paper.
On the left edge of page use Pocket and Flipfold Inserts C-Black measuring 5.5"/ 11.75". Adeher magnet on its front fold .Cover all sides with paper.
Make a Pocket on the inner fold of it.
Using Regal Borders and Pocktets diecut the papers from the top edge to form a see through stencilled cutout,one vertical,another one horizontal. Fold the last flap onto the previos one to form a pocket.
Fussycut a fish and adhere a magnet on its reverse side. This will help hold tags,fotos,notecards in place.
Before adhering this Page on the base,make sure the flap of the album closure is adhered well on the right centre edge.
The Album is done and ready to be used. Start adding your treasured photos,memoirs,notes,tags etc to this Heartfelt Creation :)
I have made a co ordinating Album Box measuring 10"/8"/ 4 3/4". Covered it with the Under the Sea Paper Collection and attached a cute little Mini Envelope to keep a secret note in it for receiver to read :)


Really awesome creation
ReplyDeleteThank u Suzna :)
DeleteAn absolutely stunning, priceless piece of art Meraj. Incomprehensible that you weren't selected, it certainly cannot be that you aren't talented enough. Perhaps you are destined for even better things. I hope your dreams come true, you deserve it so much :) xXx
ReplyDeleteThank u so much for your appreciation and kind words Claire :)
Deletestunning creation xx
ReplyDeleteThank u Gayathri :)
Delete