Wednesday 22 June 2016

You r the best...Heartfelt Creations

786/110


You are the Best...My Heartfelt Creation says it with the smiles of flowers ..... And this is for my most Awesome Sister...a Real Superwoman Seema Zaidi Rizvi ....who has time and again shown with her courage that no matter how difficult the path is , with patience, determination, hard work,will power,sacrifice and faith in God,one can keep crossing all the hurdles and obstacles life throws at us....She has proved Kites fly against, Not with the winds......
What better way to tell someone with flowers..... :)
You are the Best


Heartfelt Creations Products Used:

Under The Sea Paper Collection
Tropical Hibiscus Dies HCD1-796
Tropical Hibiscus Cling Stamps HCPC-3736
Eyelet Oval Dies  HCD1-776
Sunrise Lily Wishes Cling Stamps HCPC-3721

Other Products Used:
White Cardstock
Versamark Watermark Stamp Pad
Ranger's Clear Embossing Powder
Ranger's Heat It Drier
Ranger's Distress Inks Worn Lipstick,Fired Brick.
White Glue
Foam Glue Dots
Twine

Instructions:

Take a White Folded Cardstock measuring 7 1/4"/ 6"
Cut a handmade cardstock in blue shade measuring 7.2" / 5.6". Adhere on top of the base card front.
Cut another cardstock measuring 6.8" / 5.2 "
Cut an 'Under the Sea Collection' paper measuring 6.4" / 4.8". Adhere it on the white layer.Wrap around the twine on its centre and tie a bow knot. Adhere these couplet layers on the base of white and blue cardstock.
Cut a white Cardstock  from Eyelet Oval Dies.Weave a twine string all around the Eyelet Oval Lacey Frame and tie the bow knot on the centre of right edge.
Cut a plain oval from 'Under the Sea Collection' using Eyelet Oval Dies. Adhere it on the centre of the previously cut Eyelet Oval Diecut.
Cut a Sentiment 'You're the Best' from the Paper Collection,adhere it accordingly.Glue two white pearls on its right side.
Use Glue Foam Dots and adhere it to the card base to give it a raised look and non interference with the twine wrapped around.
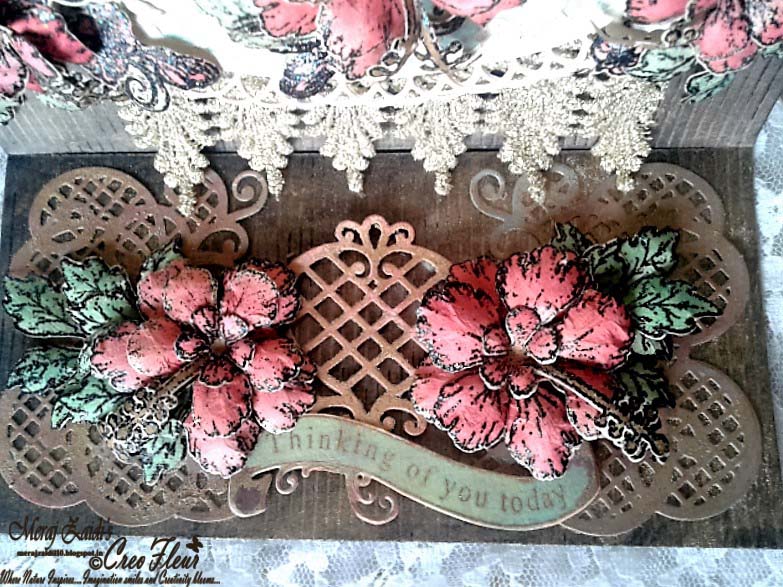
Arrange and adhere the Hibiscus flowers and leaves over it. To make the flowers and leaves,Stamp the Tropical Hibiscus with Versamark,Heat Emboss with Clear Embossing Powder.Cut with co ordinating dies. Color it with Distress Inks in shades of pinks and reds. Using Deluxe FLower Shaping Kit, shape up the flowers. Arrange and adhere it to the Twine Woven Eyelet Oval cutout.

The inside of it has a handmade blue cardstock cut with Eyelet Oval dies and stamped with Sunrise Lily Wishes Stamps.

A Heartfelt wish is ready to speak the unsaid words :)


Thanks for stopping by :)


Wednesday 15 June 2016

My Hibiscus Rose, Heartfelt Creations

786/110
Although i love hibiscus...but this time i wanted to shape it differently and in the process i landed up creating a Hibiscus Rose...here is a card i am sharing .... my Hibiscus Rose :)


Best Wishes

Heartfelt Creation Products Used:
Under The Sea paper Collection
Tropical Hibiscus Dies HCD1-796
Tropical Hibiscus Cling Stamps HCPC-3736
Timeless Amour Dies HCD1-728
Fleur Borders and Pockets Dies HCD1-778
Leafy Branch Die HCD1-757
Enchanted Dragonflies Cling Stamps HCPC-3693
Enchanted Dragonflies Dies HCD1-770
Deluxe Flower Shaping Kit HCST1-401

Other Products Used :
Dull White Cardstock
Offwhite Handmade cardstock
Versamark Watermark Stamp Pad
Ranger Princess Gold and Enchanted Gold Embossing Powder
Shimmerz Inklingz Coral Reef,First Blush and Beets Me
Spellbinders Tudor Rose Card Front S4-502
Pearl Strings
Acrylic Sticks
Half Pearls
Scoring Board
Beads
Glitter
Lindy's Stamp Gang Sprays' Shades of Red
Ranger's Distress Inks -Worn Lipstick,Fired Brick,Vintage Photo


What better way to send your Heartfelt Best Wishes Wrapped with your Creativity..

Instructions:
I took 8 1/2"/ 12" Handmade Cardstock
Fold it into half, it measurs 8 1/2" / 6"
Take another white cardstock of size 7 1/2" 5 1/2" to layer on front panel.
Use Timeless Amour Dies to get 3 heart shapes and 2 each of other shapes.
Use the hollow heart cut out as stencil to color up a solid heart in the centre of the card using Distress Inks.
Use Scoring Board to score the lines on it to give it a corrugated look,leaving apart the colored Heart. Let it remain plain.
Adhere one layer of Heart diecut aligned over the colored one.
Place another layer of heart over it,apply glue only at base and centre point to give a 3D effect to it.
In the centre of heart layers,paste the smaller lattice heart.
Diecut and color brown with distress inks the two Leafy Branch diecuts.
Adhere them in oppsosite directions.
Using Tropical Hibiscus Dies,cut and color the flower with Lindy's Sprays.On the edges of the petals use Shimmerz Inklings.
To create this rose from Hibiscus Dies,cut off the Stamens.Use Deluxe Flower Shaping kit to emboss and shape it. Use glue on all the petals overlapping one another to form a bud like shape,once dry adhere on the lower layer of flower . 
Adhere the Pearl strings and on top of that place and glue down the Hibiscus Rose.
Cut the 'Best Wishes' sentiment from 'Under The Sea' paper collection and paste it on the right lower corner.
Place and glue the Acrylic Stick at the base of the Sentiment.
Pour some white glue on the upper edge of Acrylic Stick and sprinkle the Glitter Beads over it. Once dry,dust off the extras.
On top left corner,adhere few Acrylic Sticks,adhere a Golden Heat Embossed Enchanted Dragonflies diecut with couple of hanging pearl strings.
 On the left inside of the Card, use a diecut of Fleur Borders and Pockets,ink them up , and adhere from two edged sides to form a sleeve to hold a small notecard from 'Under The Sea Collection'.
On the right inside of the card I used Spellbinders Tudor Rose Card Front diecut,ink it up.Paste it. In the centre,cut and adhere a sentiment 'Happy Birthday'.

The Heartfelt Card is ready to send its wishes to the loved ones :)


Thanks for stopping by :)

Saturday 11 June 2016

Heartfelt Creations 'Thinking of You'

786/110


Hello Crafty Friends...Inspired by one of my favorite dresses...i wanted to make a card with the richness of gold ,elegance of black and smiles of soft pink flowers...hope u like it...below is te complete tutorial of this easel card...do leave some love if u like it :)

Glitter Bright With A Shine

Tropical Hibiscus Dies HCPC-3736
Tropical Hibiscus Cling Stamps HCD1-796
Classic Leaf Dies HCD1-736
Classic Leaf Cling Stamps HCPC-3546
Bold Leaf Cling Stamps HCPC-3547
Enchanted Dragonflies Cling Stamps HCPC-3693
Enchanted Dragonflies HCD1-770
Timeless Amour HCD1-728
Eyelet Oval Dies HCD1-776
Decorative Oval Dies HCD1-762
Sunrise Lily Swirls Dies HCD1-788
Sunrise Lily Swirls Cling Stamps HCPC-3722

Other Products Used:
Spellbinders Criss Cross Dies S5-197
Black Cardstock
White Cradstock
Golden Wire Laces
Foam Sheets
White Glue
Eberhard Faber Granite Gold Sand Texture Paste
Versamark Watermark Stamp Pad
Ranger's Princess Gold Embossing Powder
Ranger's Black Sparkle Embossing Powder
Lindy's Stamp Gang Spray-Ramblin Rose Pink,Bucket o Blood Red
Scoring Board
Die Cutting Machine

Instructions
Take an 8 1/2"/ 12" Black Cardstock
Fold it into half.
Again fold the front panel into half. This will work like an easel when supported by base stopper of the lower card panel.
Take another Black Cardstock measuring 8 1/2" / 6" Cut halfway till the centre fold line with your Diecutting Machine using Eyelet Oval die. Cut  the centre sides. This will give you two cutouts,one with the half Eyelet Oval diecut and another one with an arched rectangular.
Score the lines on the arched Rectangle using Scoring Board. Rub the Gold Sand Paste over it to give it a copperlike rough metallic finish. Adhere it to the lower base of the Eyelet Oval die cut panel,aligning it properly to form an oval in the centre.
Adhere the Golden Lace on the centre fold line.

Diecut an Eyelet Oval again on a White Cardstock.
Diecut a White Cardstock using Spellbinder's Crisscross dies. Again place the Eyelet's Oval Die's Plain Oval die ,place over the crisscross cutout and run through the die cutting machine. This will give an oval crisscross cutout. Adhere it to the Eyelet Oval Diecut.
Cut one more cardstock with  Eyelet Oval and create a hollow oval in it by running it through the die cutting machine using the plain oval die. This forms as an outer border frame. Adhere it to the Eyelet Oval Cutout. This shows as a very neat frame with crisscross cutout  having proper frame.
Stamp and heat emboss the Enchanted Dragonflies Stamps on a white cardstock with Princess Gold embossing powder and die cut with the co ordinating dies. Adhere it in the centre of the Eyelet Oval Crisscross Frame.
Now Adhere this complete panel on the lower half of folded card base.
Arrange and Adhere the flowers and leaves over the Oval frame.
To make the flowers here is the procedure:
Stamp Tropical Hibiscus and Sunrise Lily Swirls with Versamark on a handmade paper with little golden sparkle on it. Heat Emboss with Black Sparkle embossing powder. Color up with Lindy's Sprays with shades of pinks and reds. Cut out with co ordinating dies. Shape it up by using Deluxes Shaping Flower Kit.

To prepare the lower panel of card base, cut a Black Cardstock measuring 4 1/4" / 8 1/2 ".
Using Scoring Board,score vertical lines to create a corrugated look. Rub on the Gold Sand Texture paste over it.Adhere it on the lower base. The upper edge of this panel will support as a stopper for making the front card panel stand up.
Diecut the Cardstock with Decorative Lattice Swirl dies.Rub on the Gold Sand Paste over these. Adhere them on the card base on right and left sides.
Diecut a cardstock and a foam sheet with Timeless Amour dies. Adhere paper diecut over the foam sheet diecut and glue it in the centre of the lower card base.
Glue down the flowers and the 'Thinking of You' stamped n diecut banner.

The Heartfelt Easel Card is ready to wish someone :)


Thanks for stopping by :)