
While sitting with a friend of mine..she said she was planning for a gift and a card for her hubby ,something where she could write down her feelings and every note should emerge as a beautiful surprize ...and something which could be hung in her room :) Since she and her hubby both are coffee addicts and spend their most special moments while sipping coffee... i thought i will make something that will make her happy....so came up with an idea to do something with coffee theme along with the expression of love :)
I am here today sharing Tags in a Tag... :) Minimum 7 tags can be slipped inside the seperate pockets and sleeves...,maximum is up to u :) There is also a Slip In Journalling Notecard where you can write your thoughts and wishes both in front and back side. This can also be hung on the wall as a decor piece....:)
Also, i wanted to enter the More Than Words Mini Challenge where the word Magic has to be used.
To put my ideas into existence my Heartfelt Creations Goodies smiled at me and here i go with my favourite HC products used here...
Cut Mat Create 2B Dies
Cut Mat Create 2A Dies
Birds and Blooms Cling Stamps
Birds and Blooms Dies
Regal Borders and Pockets and Dies
Classic Leaf Cling Stamps
Bold Leaf Cling Stamps
Classic Leaf Dies
Fleur Borders and Pockets Dies
Coffee Talk Cling Stamps
Coffee Talk dies
Majestic Bloom Cling Stamps
Majestic Blooms Dies
Lugguage and Tag Dies
Blazing Poppies Paper Collection
Raindrops on Roses Paper Collection
Deluxe Flower Shaping Kit
Other Products Used
White Cardstock for Tag Base
White Cardstock for stamping Coffee Talk images
White Cardstock for die cutting
Black Cardbase
Twines
Colorbox Fluid Chalk Inkpad
Ranger's Black Archival Ink
Ranger's Distress Ink - Peeled Paint
Prima Tag
Prima Crystals
Twine for tags
Letter Stamps
Glue
Instructions :
Take a Tag of 3.5 " by 8.5". Ink up the edges with Distress inks. Stencil it with the diecuts.
Choose 6"/6" Blazing Poppies Paper. Cut a straight mark on the pocket top edge to make the real pocket to slide a tag in it. Fold at 2.5 " with small part showing blue denim pocket in front and bigger part at the back of the Tag.Apply glue on the fold crease,on the top edges and bottom edges and adhere on the left edge of the tag. This will have side openings or a sleeve to slip in tags and notes both in front and back.
Die cut the Fleur Borders and Pockets and other dies,,ink them up with desired color effect of your choice,i used green and red.
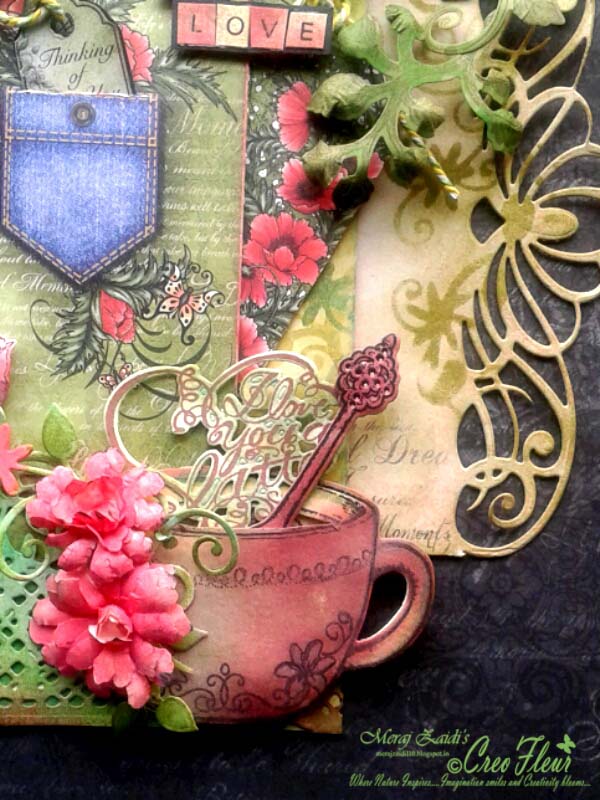
Stamp the coffee mug,spoon,and latte image with Black Archival Ink,die cut and ink up with distress inks and watercolors. Make a slit at the opening of the coffee mug to insert spoon and latte heart in it.
Take another 6"/6" Blazing Poppies paper,place Regal Borders and Pockets Die on one edge of it and run through die cutting machine. Ink it up.
Die cut the Tags from Blazing Poppies and Raindrops on Roses Paper Collection with Lugguage and Tag Dies.Ink up the edges. Leave them blank for journalling.
Stamp and die cut the leaves and flowers and bird,color them with watercolors.
Stamp the letters on pre inked cardstock and cut them manually and stick over black cardstock. I cut them unevenly to give a little shabby look to it :)
Start placing as a rough layout first and once contented with your placement,start adhering according to your style.
Spell the Magic of Heartfelt Creations again and again :)
Please go through all the pictures with different angles and closeups below .
Hope you like it :)


Back Side of the Tag


Thanks for stopping by :)
Very attractive and beautiful.
ReplyDeleteLovely .thanks for the whole explanation.
Thank U Amee :)
DeleteThis is stunning Meraj. I am a new follower too :)
ReplyDeleteHugs
Linda xxx
My goodness I just had to come over & pay you a visit to tell how beautiful this tag is. The details you have included in it is nothing short of AMAZING. Totally gorgeous. Thanks so much for playing with us over at More Than Words. :)
ReplyDeleteThank u so much Di....words coming from such a wonderful and talented crafter whom i have always admired has touched my heart to tears...tears of joy Di :) Thanks so much once again :)
DeleteAwesome superb gorgeous all r for ur creation
ReplyDeleteThank u so much Pooja :)
Delete