Friday, 19 February 2016

Remembering Beautiful Moments..

Hello folks...here is a tutorial i am sharing for a card using Heartfelt Creations products...hope u enjoy n like it :)


CARD

Heartfelt Creations Products Used:

Birds and Blooms Die HCD1-756
Birds and Blooms Cling Stamps HCPC-3644
Fluffy Birds Stamps HCPC-3646
Raindrops On Roses paper Collection
Deluxe Flower Shaping Kit HCST1-401

Other products Used:

Spellbinder Circle dies
White Cardstock
Cheery lynn Die
ColorBox Fluid Chalk Inkpad Pink Pastel
Distress Tool
Ranger Distress Ink Vintage Photo.
Ranger Archival Ink Jet Black
Mod Podge
Watercolors
Pink Silk Twine
Foam Glue Dots

Instructions:

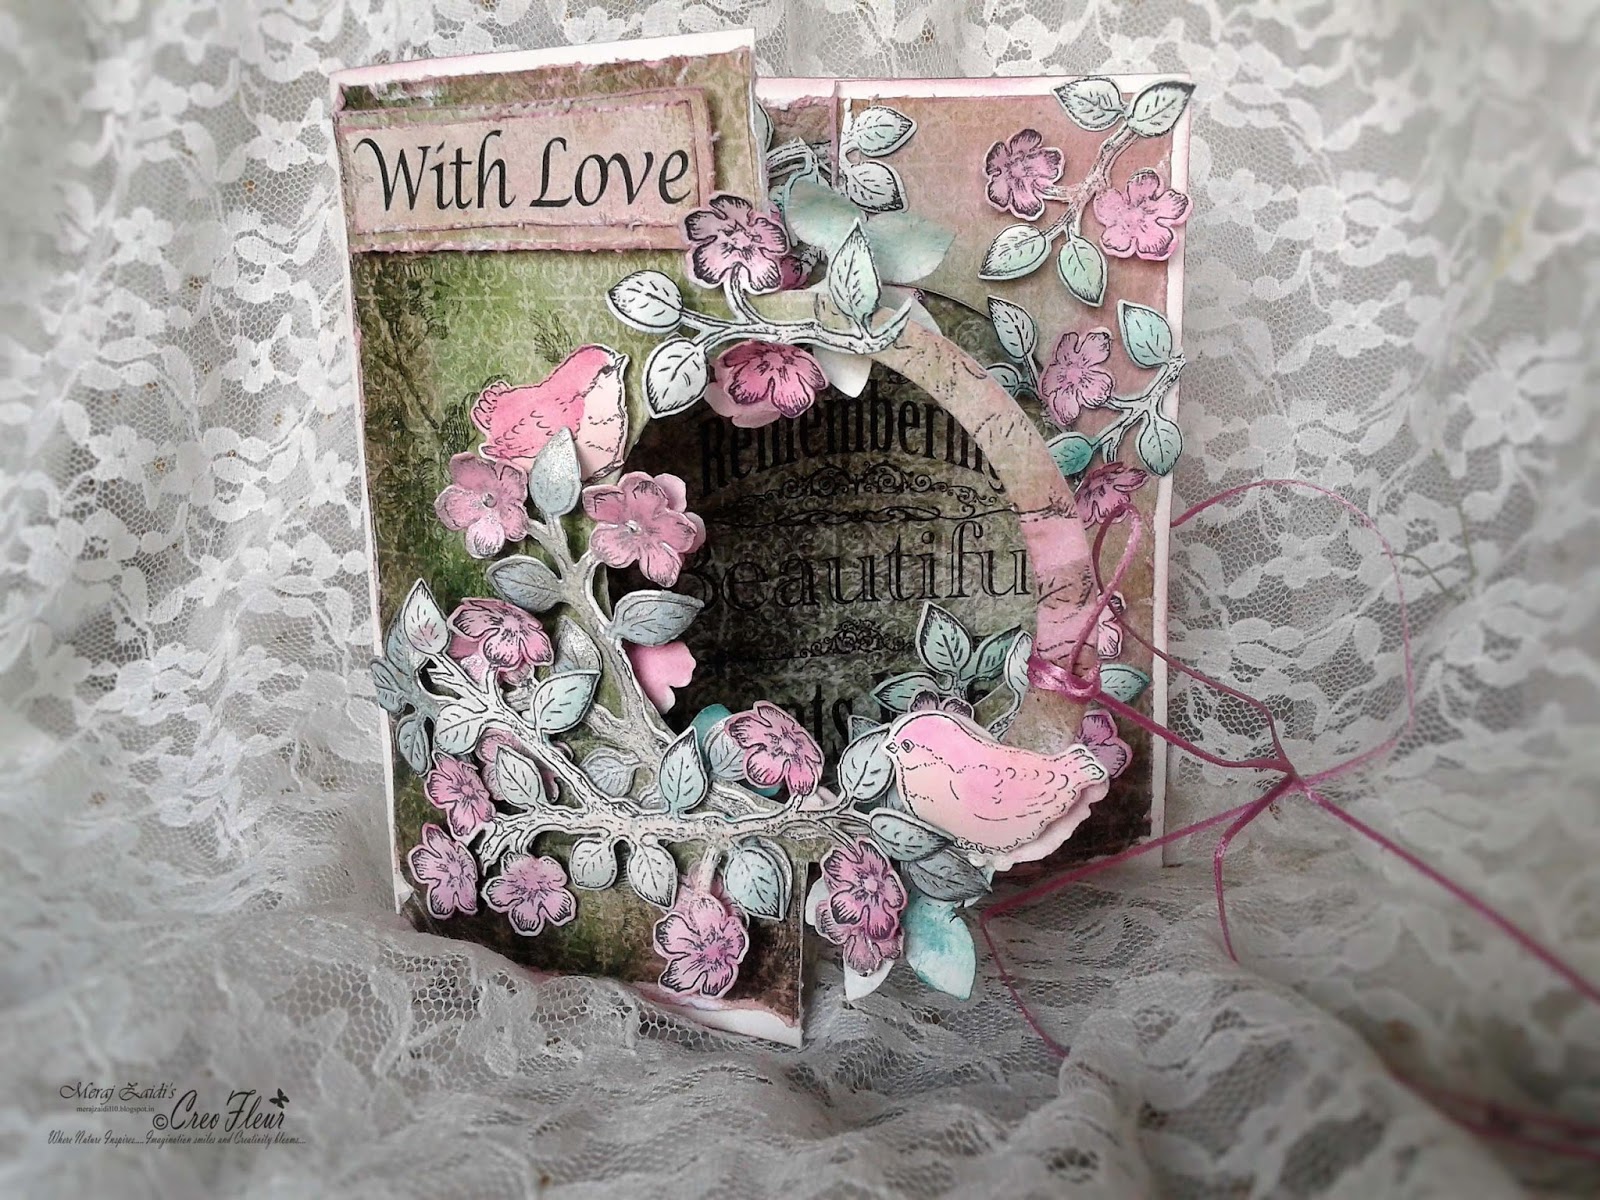
Fold the 12"by 6" cardstock into half making it 6"by 6".
Select a paper of your choice,I chose the paper with sentiments on it.
Cut it into four equal parts each measuring 5 3/4 by 5 3/4".
Distress the edges with distressing tool and ink it with Vintage Photo.
Shade the sides of these papers with Pink Pastel Colorbox Ink.
Apply Mod Podge behind the papers with a brush and adhere all 
the four papers on the 4 panels of the card.
Place the circle die on the front panel in the centre.
In the die cutting machine,place the cutting plate halfway over the
circle die and run the machine,this will cut only a half circle.
Now place a smaller circle inside this half circle and run the machine,u will get a hollow circle window .
Cut the upper and lower sides where the half circle outer edge begins.U will get a semi circle panel again with it.
Adhere this on the right side of base panel aligning the staright edge with it.
This gives a beautiful opening to the card from front and inside.The circle window shows the inside sentiment through it.

Ink up the Bird n Bloom stamps with Archival Ink,its waterproof ,so while coloring with watercolors the stamped image will not bleed.
Die cut it. Color the leaves,flowers and birds with watercolors using shades of greens and pinks.
While still wet,shape up the flowers and leaves from reverse side with a stylus using Deluxe mat.Let it dry,this makes it firm and stiff.
Color the birds also and shape it up with a big round stylus.

Arrange and adhere these birds,flowers and leaves on top and inner circle of the card and on the base panel.
Cut a sentiment,distress,ink and adhere on top left with foam glue dots.
Attach a pink silk twine,one around the circle border and one behind the base panel.Tie it to keep the card panels look intact.
One more Heartfelt Creation is ready to be cherished and gifted to someone u care for :)

View the pics taken with different angled closeups :)


Thanks for stopping by :)

Life is Wonderful

Hello all...inspired by More Than Words Feb Challenge...Here is a layout i created for my sweet brother and niece using Gorgeous Heartfelt Creations products...i am sharing the complete tutorial for it.I have used very mild sparkle which may not be spotted very clearly as the camera cld not really catch the mildness of it :)


The link for the MTW Challenge is below..


Scrapbook Page Layout

Heartfelt Creations Products Used:

Vintage Floret Die HCD1-727
Bold Vintage Floret Cling Stamp HCPC-3501
Majestic Blooms Cling Stamp
Majestic Blooms Die HCD1-742
Classic Leaf Cling Stamp HCPC-3546
Classic Leaf Die HCD1-736
Bold Leaf Cling Stamp HCPC-3547
Arianna Lace Die HCD1-747
Cut Mat Create 2A die HCD2-751
Cut Mat Create 2B die HCD2-752
Once Upon A Time Paper Collection
Cascading Fuchsia Paper Collection
Deluxe Flower Shaping Kit HCST1-401


Other Products Used:

ColorBox Fluid Chalk Inkpads Ice Jade
ColorBox Fluid Chalk Inkpads Lime Pastel
ColorBox Fluid Chalk Inkpads Pink Pastel
ColorBox Fluid Chalk Inkpads Warm Red
Ranger Distress Ink Shaded Lilac
Ranger Distress Ink Peeled Paint
Ranger Distress Ink Walnut Stain
Ranger Distress Ink Vintage Photo
Rangers Glossy accents
Watercolors
Glue Dots
Lindy's Stamp Gang Spray Alpine Ice Rose
Silicone Glue
Glass Cobochons
Stamens
Distressing Tool
Black Heavy Chipboard Base 12.5" / 12.5"
5" / 7" Photograph

Instructions:

Shaping the Vintage Floret Flowers - 


Shade the stamp petals with different Colorbox fluid inks (Ice Jade, Lime Pastel,Pink Pastel), 
blend it well and on the edges of petal ink with Warm red.You can use a dauber also for shading and blending.
Stamp the images on an offwhite paper of approximately 120 Gsm.Diecut it.

Dampen gently the reverse side of floral diecuts with a wet brush,using Deluxe Shaping tools,
shape up the flower petals by pressing in round strokes with a stylus.Turn up onto the stamped 
side and press in centre to give the flower a raised convex shape from its centre.

Layer up and adhere the flowers from biggest to smaller size and on top make a bud like opening.

Shaping the Majestic Blooms -

On a plain 120 GSM offwhite paper paint with random brush strokes,
 blending shades of pinks and pale yellow.Let it dry.

Use Majestic Bloom die to cut the flowers.On the edges of petals shade
 again with darker pink color to make flowers little bright and colorful.

Spritze some water on the flower cutouts and using Deluxe Mat use 
the stylus to shape the petals from reverse side. Turn it upside down and 
press with small stylus to raise and shape it from centre.Let it dry again.

Apply Silicone Glue on the top centre of colored flower,place some stamens over the glue ,
 press and fold the flower in quarter half.Once completely dry,
they become firm and stiff with proper shape.

Prepare single layered flowers of different sizes with same method.


Prepare the base with heavy black chipboard, choose the 12 by 12 inch paper
 of your choice that can go with your photo picture. I chose this paper where
 i could fit my  photo in terms of size and color. Distress it and ink it up with Vintage Photo and Walnut Stain.
I used Lindy's spray over the paper to give some shiny hue

On back of photo i adhered about 4" by 3" 4mm thick chipboard and pasted it on the base.
It gives space to slide in the layers and embellishments beneath and around the photo.

Since the HC papers are so beautiful ,i take extra care as not to let the beauty
 hide behind too many layers and embellies. So plan your arrangement in such a 
way that it does justice to the awesomeness of the paperdesign. 

I used lot of diecuts from Arianna lace and Cut Mat Create to compliment the design.
Cut it on white cardstock and ink it up.

Use the Sentiments,cut them and paste on black cardstock to give firmness and crisp look.
 I distressed the edges with the distressing tool and inked up with Vintage Photo and Walnut Stains.

Instead of using any clock charm,i used a glass cobochon over the clock images
 to give a feel of 3D glass clocks without hiding its beauty :)

 Finally,first lay out and place all the flowers,adornments,sentiments,diecuts etc,
decide the final arrangement with balance of elements and picture. Adhere them accordingly 
and your Heartfelt Creation is ready to be framed with a moment captured in it :)

Please have a look below at detailed pictures...


Thanx for stopping by...:)


Thursday, 18 February 2016

A Heartfelt Creation...My wish for you..

I just made this Easel Card today and was very excited to post it...obsessed by Heartfelt Creations , i have used all products here of  HC..,the stamps, the dies, the sentiments,the papers and more. The highlight of this easel card is that i tried a new technique of using their diecut as stencil to use with  different mediums and gave my paper a new look by giving texture using HC's own product. Please go through all the closeup pics to see the detailed stamping,stencilling and shading on flowers.These are the products i used here..

Cascading Fuchsia paper Collection
Once Upon a Time Paper Collection
Vintage Floret paper Collection
Vintage Floret Dies and co ordinating stamps
Majestic blooms dies and co ordinating stamps
Classic leaf dies and co ordinating stamps
Decorative Oval Die
Regal Borders and Pockets Die
Colorbox Fluid Chalk Inks in shades of Greens and Pinks
Texture paste


Friendship in Bloom ( Heartfelt Creation)

A warm hello to all my crafty friends.Today i am sharing an altered creation using my all time favorite Heartfelt Creation dies and stamps. I just love the versatility of HC products.Creating and coloring the flowers...a complete crafty process gives such a delight to heart and eyes once finished. Here is a metal cage and i have used Birds and Blooms stamps and dies, Cut Mat Create 2B dies,Cascading Fuchsia dies and stamps,Sentiments and Tag  from  HC Paper Collections along with the Colorbox Chalk Fluid Inks.

You can visit the link below to learn to make Cascading Fuchsia Flowers


Hope u enjoy creating heartily :)


Thanx for stopping by :)

Raindrops on Roses ..My Heartfelt Creation :)

Hi all...this is a complete handmade album from start to finish. I have used beautiful Heartfelt Creations Raindrops on Roses Paper Collection.Its a keepsake to treasure and cherish your photos,memoirs,notes with lots of tags,journalling cards ,envelopes and more...