Thursday, 23 February 2017

Beautiful Moments..


786/110/92

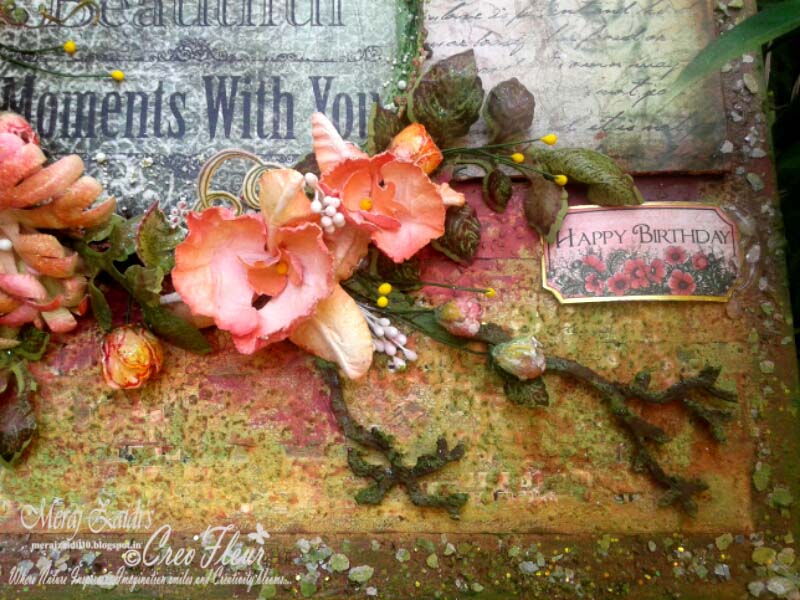
Beautiful Moments...A Mixed Media Frame !
 Another second submission I did from all my heart and soul for the HCDT Call.

Heartfelt Creations Products can make any crafty dream come true...be it making a card, a 3d project, a journal, or a mixed media.
Using its beautiful design papers,stamps and dies,I have created this mixed media decor frame.

Heartfelt Creations' Products Used :

Large Elegant Word Background Stamp HCPC-3323
Botanic Orchid Die HCD1-7101
Classic Leaf Cling Stamps HCPC-3546
Bold Leaf Cling Stamps HCPC-3547
Classic Leaf Die HCD1-736
Classic Rose Cling Stamps HCPC-3752
Classic Rose Die HCD1-7110
Wildwood Florals Cling Stamps HCPC-3769
Wildwood Florals Die HCD1-7125
Enchanted Mum Die HCD1-768
Once Upon A Time Paper Collection
Raindrop on Roses Paper Collection
The Blazing Poppies Paper Collection

Other Products :

Black Chipboard 12"/18" and 12" 12"
Archival Inks - Magenta Hue,Venetian Orange, Monarch Orange, Watering Can,Red Geranium, Olive,Leaf Green,Potting Soil,Jet Black.
Lindy's Stamp Gang Poinsettia Red Gold
Spritz Olive Branch Shimmerz
Finnabair Heavy Gesso,Clear Gesso,Mica Flakes Granite,Glass Glitter,Glass Glitter Gold Rush,Mica Flakes Mulberry,Art Stones.
Cosmic Shimmer Glitter Jewels
FolkArt Painted Finish Moss
Chalk paints
Glass Cabochons
Green Floral Wire
Stamens n Pollens
The Crafters' Workshop Stencils
Lid of Waste Can
Metal Chain
Gold Paper
Glue Gun
Multi Medium Matt
Gold Mist Spray
Texture paste.
Die Cutting Machine
Decoupage Glue
Double Sided Foam Tape

Instructions :

Cut the Once Upon A Time Design Paper into these sizes of 12"/ 3.25 " and 12"/ 7.5". 
Adhere these two pieces of design papers onto the same size of chipboards using decoupage glue.
Apply Clear Gesso all over it.
Stamp with Large Elegant Word Stamp,stencil it with texture paste to give texture and cage effects. Spray with Shimmerz Spritz Olive Branch , gold mists and Lindy's Stamp Gang spray.
Using double sided foam tape adhere these two peices on the larger chipboard sized 12"/18" .
Adhere as seen in finished project.The larger one on the right side,the narrow one towards left lower side leaving half an inch on four side edges.
On the spaces on upper left side and lower right side of the big chipboard base,stick the vertically cut strips of design paper Raindrop on Roses.
Texture them up with moss,chalk colors and texture pastes.
Take a 5" diameter lid of any waste can and cut the same circular shape of design paper Raindrops on Roses " Remembering Beautiful Moments With You",
Adhere the design paper to the inside base of the lid and color and texture its rim with heavy gesso,moss and colors.
Adhere this lid towards the lower left side.
Adhere glass cobochon on the clock on the lower left side and upper right round sentiment.

Here I have used flower dies and stamps of Enchanted Mums,Botanic Orchids and Wildwood Florals.
Leaves are from Classic leaf,bold leaf and Classic Rose dies and stamps.
To make the flowers, first stamp and color with archival inks Magenta Hue,Venetian Orange, Monarch Orange,Red Geranium to create a shaded tinted effect.
To make leaves stamp and color with archival inks Leaf Green,Olive,Watering can.
Die cut these stamped and colored images with co ordinating dies.
Dip them in water and using Deluxe Flower Shaping Kit shape and emboss the flowers and leaves.
Apply some mild glitter using glitter spray.Pierce a hole in the centre of the ready flower and insert the stamens and pollens,seal the base with glue gun.
To make the buds,pierce a hole in the centre,put the green floral wire through it,seal it with glue gun.
Cup firmly all the petals together with glue gun in the centre to form the buds.
Twirl the green floral wire to add beauty to the flower cluster.
Now arrange the flowers as seen in the finished project and start glueing using glue gun.

Cut the sentiments from design papers,adhere on the gold paper,cut them and stick them on the desired places.
On the side border of the large chipboard base apply clear gesso,moss,texture paste,chalk paints,
Once dry,apply Multi Medium Matte and sprinkle some Mica Flakes Granite,Glass Glitter,Glass Glitter Gold Rush,Mica Flakes Mulberry,Art Stones Cosmic Shimmer Glitter Jewels
 On the right top border adher three chains with glue gun each one attached to the sentiments cut from design papers.

The frame is ready to beautify your wall now :)


Thanks for stopping by :)


Tuesday, 21 February 2017

He First Loved Us..


786/110/92

Consult not your fears but your hopes and your dreams. Think not about your frustrations, but about your unfulfilled potential. Concern yourself not with what you tried and failed in, but with what it is still possible for you to do.
 Pope John XXIII


Starting here with God's blessings I am posting here one of my three projects I made for the 2017 DT Call.

He First Loved Us... A Card with Easter Blessings !

Heartfelt Creations' Products Used :

Flowering Dogwood & Doves Die HCD1-7131
Flowering Dogwood & Doves Cling Stamp Set HCPC-3775

Flowering Dogwood Branches Die HCD1-7130
Flowering Dogwood Branches Cling Stamp Set HCPC-3774

Flowering Dogwood Die HCD1-7129
Flowering Dogwood Cling Stamp Set HCPC-3773

Dogwood Chapel Cling Stamp Set HCPC-3776

Flowering Dogwood Designer Paper Collection

Botanic Window Die HCD1-7100
Large Elegant Word Background HCPC-3323

Deluxe Flowering Shaping Kit HCST1-401

Instructions :
Other Products :
Archival Inks - Watering Can, Venetian Orange, Olive, Viridian, Leaf Green.
Watercolors
Dull Glass Glitter
Ranger's Multi Medium Matte
Green Floral Wire
Prills
Shabby lace
Stamens
ShimmerZ Spritz Olive Branch
Black Card Stock
Handmade Ash brown paper
Distress tool.
Glue Gun
Die Cutting Machine

Instructions :

The finished folded card size measures 11.5"/7.5" 
Cut,distress all the four sides and adhere the handmade paper over the 11.5"/ 6" base black cardstock.
Cut,distress and adhere the design paper from Flowering Dogwood Paper Collection,leaving 1/8th"on its top.
Stamp the flowers over it using Dogwood Chapel Stamps and Large Elegant Word Background Stamp.
Spray some Olive Branch Spritz over it.
Lightly give a light green color wash using water color over it tinting with greens and peach shades.

Take another black cardstock measuring 6"/6",adhere the distressed handmade paper over it and layer it with another design paper over it leaving 1/8th" on each side.
Spray Olive Branch Sptitz over it with water color washes giving tints n hues of peach n greens.
Stamp flowers using Dogwood Chapel Set.
Using double sided foam tape adhere it to the base card slightly towards the left side.

Diecut two pieces of cardstock using Botanic Window die. Adhere them together to form heavy body of it.Cut and adhere the design paper of the Chapel onto it.
At the base of the window adhere the lace. Now place and stick it in the centre of the square base card.

Stamp images of different flowers and doves with Archival inks using green shades. Cut them up using co ordinating dies in the die cutting machine.
Color them using finger daubers. Dip them in water to soften the paper. Place them on towel to absorb excess water. Shape and emboss the flowers using Deluxe Flower Shaping Kit.
Apply Multi Medium Matt over the sides of petals and sprinkle some dull glass glitter over it.
In the centre of the flower apply white glue and sprinkle green prills,it dries clear. Cut,color and shape the leaves also the same way.

Stamp and cut the doves also the same way,color them with water color.
Finally arrange the flowers,leaves and doves as per your desired layout sticking with Hot glue Gun.
Twist some green floral wires and glue them up in the floral arrangement.
Cut and adhere the sentiment Easter Blessings .

Here is the card now ready to send someone filled with your love and Almighty's blessings :)


Thanks for stopping by :)

Tuesday, 31 January 2017

Got feaured in Creative Inspiration Magazine

Hi friends...i am so excited and feeling blessed to share such a delightful news with u all...I am so glad to announce that my work got published in Feb 17 issue of  Creative Inspirations Magazine . Its such an honor to be featured along with such amazingly talented crafters from all around the world. I want to thank Bev Code for featuring my creations in  such prestigious and inspirational magazine for artists and crafters. To be motivated and get loads of inspiration by fabulously talented artists from all across the globe please check this link below....

http://creativeinspirationmagazine.blogspot.in/2017/01/creative-inspiration-magazine-february.html

Happy Crafting :)


Wednesday, 25 January 2017

A Heartfelt birthday wish..


Hello friends...
This is another birthday card i made with base almost similar as the other card i just posted. I can't resist myself using my favorite stamps n dies from Heartfelt Creations...these are Wildwood Cottage Darlings, Classic Rose dies,Majestic bloom dies, Classic leaf stamp n dies along with Spellbinder's Card Creator dies.
The sentiments are from Kaiserkraft along with distress and Archival inks along with glitters.
Loved making these cards for a friend's friend :)

Here are some closeup pics with different moods and angles...


Thanks for stopping by :)


A Heartfelt Fairy Wish..

A friend of mine called me to ask if i can make a quick birthday card for someone special that makes her feel happy....and i said yes to her as i just got my new Heartfelt Collection's Wildwood stamps and dies...what could be a better way unpacking my new Heartfelt collection to make these fairies wish a very special happy birthday to someone special :)


A Heartfelt Fairy Wish !

Products Used:
 Wildwood Florals Cling Stamps HCPC-3769
 Wildwood Florals Die HCD1-7125
 Wildwood Cottage DarlingsHCPC-3770
 Wildwood Cottage Darlings Die HCD1-7126
Deluxe Flower Shaping Kit HCST1-401

White Cardstock
Spellbinders' Card Creator Die
Diecuts n More  Stitched Circles Die
Kaisercraft's Sentiment Stamps
Daubers
Scissors
Paper Trimmer
Glitter
Silk Twine
Glue
Glue Dots
Hot Glue Gun
Glue Sticks
Water Mister
Half Pearl String
Half Cut Beads for flower centres
Die Cutting Machine
Bone Folder
Score Board

Ranger's Archival Inks -
For Flowers : Pink Peony, Venetian Orange,Sunflower, Monarch Orange
For Leaves : Leaf Green, Library Green,Fern Green,Olive,Peat Moss,Pink Peony,Venetian Orange
For Sentiments : Tiger Lily

Fairy Image : Jet Black Archival Ink and Zig Clean Color Real Brush Markers

Instructions :
After folding, the card base measures 6" x 8 1/4" size. 

Color the centre  of the card base with daubers using shades  Leaf Green, Library Green,Fern Green archival inks.

Cut a white cardstock to 5 1/4" x 7" size. Place the spellbinder card creator die diagonally on it and die cut it. Keep it straight on a scoreboard and with a bone folder mark 1/8" fold lines all over vertically, only on the plain areas of paper. Using a pencil end roll slightly all the four corners. Roll the top left corner inwards,the top right corner slightly outwards,the lower right corner outwards and the lower left corner rolled outwards too. Apply glue on the folded corners underneath and adhere in a slant diagonal position on the card base. 

Cut another cardstock, using spellbinder die  diecut a piece of the paper,cut it into four equal parts. 
Position and adhere these four diecut pieces on all the four corners,edge to edge of the card base. Adhere the pearl string in L shape border as seen in the card picture. 

Die cut two circles of 3" and 2.5" diameters size. Stamp on the bigger one with the wildwood floral design randomly using Tiger Lily archival ink. Stamp the sentiment on the smaller circle. Glue and wrap around a silk twine beneath the stamped sentiment. Using foam glue dots adhere the small circle over the bigger circle and attach it to the centre of the spellbinder die cut design.

Stamp the Wildwood Florals with Monarch Orange and Pink Peony archival inks. Color them with other shades of inks mentioned above. Stamp the leaves with Fern Green archival ink and color with the shades mentioned in the product list. Using co ordinating dies ,cut these. With water mister spray and moisten these flowerr and leaves,shape them using embossing tools and glue them in layers. Apply clear glue drop in centre of the flower and adhere the bead. Apply clear glue on flowers,leaves and fairy image and sprinkle glitter for sparkly effect.

Stamp the fairy image with  Wildwood Cottage Darlings Stamp Set using Jet Black archival ink. Color it with the Zig Clean Color Real Brush Markers. Cut with the co ordinating dies. 
Arrange and adhere the flowers,leaves and fairy image using hot glue gun. 


Thanks for stopping by :)

Wednesday, 7 December 2016

Let your soul sing..


Hi friends....life has been very hectic with so many responsibilities to be fulfilled first. But my passion somehow keeps stealing time to create something :)....Here i am today with a card i created with a vintage look using Heartfelt Creations Poppy dies along with different stamps and stamping techniques..giving a shabby look to it.... I am posting this in real haste...so have not listed down the products used...will update it later...if u have any question u may please message me...thanks.

Hope u like it..here are the few closeup pics....


Thanks for stopping by.... :)